Views: 0 Author: Site Editor Publish Time: 2025-08-22 Origin: Site


You should know how stainless steel pipe problems happen. This helps you stop them and fix them the right way. Most problems come from corrosion, cracks, or leaks. These issues often start because of chloride, not cleaning well, or touching other metals. You may see pitting, crevice corrosion, or stress from poor installation. If you pick the right stainless steel pipe, you can avoid many problems. Choosing good pipes and fittings helps repairs last longer. It also keeps your system safe.
Common failure causes:
Pitting and crevice corrosion from chloride ions
Stress corrosion cracking
Galvanic corrosion with other metals
Poor cleaning or passivation
Bad installation or support
Pick the correct stainless steel grade, such as 304 or 316, to stop rust and help pipes last longer.
Check pipes often for rust, leaks, or cracks so you find problems early and save money on repairs.
Weld big cracks or holes and use clamps for small leaks to fix pipes well.
Clean pipes gently with mild cleaners and do not use chloride to keep the pipe’s surface safe.
Test pipes after fixing them for leaks to make sure they are safe and work for a long time.
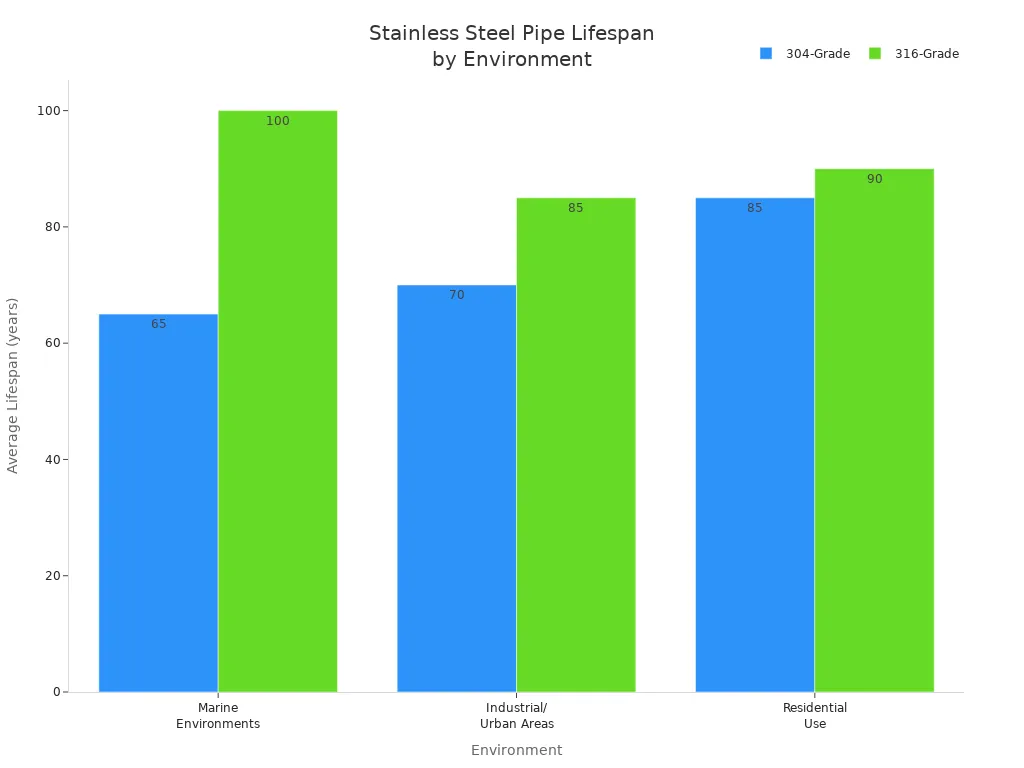
Corrosion and leaks are common problems with stainless steel pipes. Corrosion starts when the pipe’s protective layer gets damaged. This can happen if you use strong cleaning chemicals. Salt air can also cause damage. Pipes touching other metals may corrode too. Over time, corrosion causes pitting and rust. These problems can lead to leaks. Most stainless steel pipes last 70 to 100 years. Picking the right grade and taking care of pipes helps them last longer. Pipes made from 316-grade stainless steel last even longer. They work well in tough places like near the ocean or in factories. Checking and cleaning pipes often helps you find corrosion early.
Tip: If you see rust, leaks, or low water pressure, check your pipes. Replace pipes if they are over 70 years old or look damaged.
Here is a table that shows how long different grades of stainless steel pipes last in different places:
| Environment | 304-Grade Lifespan | 316-Grade Lifespan |
|---|---|---|
| Marine Environments | 50-80 years | 100+ years |
| Industrial/Urban Areas | 40-100+ years | 70-100+ years |
| Residential Use | 70-100 years | 80-100+ years |
Cracks and deformation can make your stainless steel pipe system unsafe. Cracks can form from stress or big temperature changes. Bad installation can also cause cracks. Pipes bend and stretch if they hold heavy things or get hit. Snow and traffic can also bend pipes. These stresses can make cracks go around or along the pipe. Soil and water in the ground can cause problems too. Mistakes during installation or construction can damage pipes. This makes cracks and deformation more likely.
Main causes of cracks and deformation:
Bending and stretching from heavy loads or temperature changes
Internal pressure and outside impacts
Soil moisture and pH levels
Poor installation or damage from others
Corrosion pits that start cracks
Look for bulges or dents in your pipes. This is important for pipes underground or in busy areas. Picking the right grade and type of pipe helps stop these problems. It keeps your system working safely.
When you pick stainless steel pipes, you should look at the grades. Each grade works best for certain jobs. Grade 304 is very common. It resists corrosion and fits many places. Grade 316 has molybdenum. This helps it fight pitting and crevice corrosion. It is better for salty or chemical areas. If you work near the ocean or in a plant, choose 316 or 316L.
Here is a table that compares different grades of stainless steel pipes:
| Stainless Steel Grade | Key Properties | Environmental Suitability | Impact on Longevity and Performance |
|---|---|---|---|
| 304 | Excellent corrosion resistance, good heat tolerance | General exhaust, damp or salty conditions | Durable, low maintenance, keeps polished look |
| 316 / 316L | Molybdenum for better pitting and chloride resistance | Marine, chemical, chloride-rich areas | Superior corrosion resistance, longer service life |
| 316Ti | Titanium for thermal stability | Severe chemical and marine environments | Exceptional durability, handles extreme conditions |
| 409 | Budget-friendly, moderate resistance | Short-term or hidden exhaust parts | Lower longevity, cost-effective |
| 321 | Good thermal stability | High-temperature uses | Performs well under heat cycles |
| 439 | Superior resistance, controls thermal expansion | Automotive exhaust, durable | Balances cost and performance |
The right grade makes your pipes last longer and work better. For high-pressure or hot jobs, use a stainless steel seamless pipe. Seamless pipes have no welds. They are stronger and leak less. Dejia Steel sells seamless and welded pipes in grades like 304, 316, and 321. Their pipes meet ASTM standards. This means you get good quality.
Note: The main difference between 304 and 316 is molybdenum in 316. This makes 316 resist corrosion from salt and chemicals much more. For food, water, or general use, 304 is fine. For marine or chemical jobs, pick 316.
Think about where and how you will use your pipes. The place around your pipes changes how long they last. In cities, pollution and acid rain can hurt pipes. In factories, chemicals and wet air attack the metal. Near the sea, salt air causes fast corrosion. Pick pipes that resist these problems.
Main things to think about:
Site type: rural, urban, industrial, or marine
Temperature and humidity
Pollutants like sulphur dioxide and chlorides
Local micro-climates (like acid condensates)
For tough places, use 316 or super austenitic grades like 254 SMO. Duplex grades such as 2205 and 2507 also resist pitting and stress corrosion. These pipes are best for chemical plants, marine sites, and oil fields. Dejia Steel has these advanced grades for hard jobs.
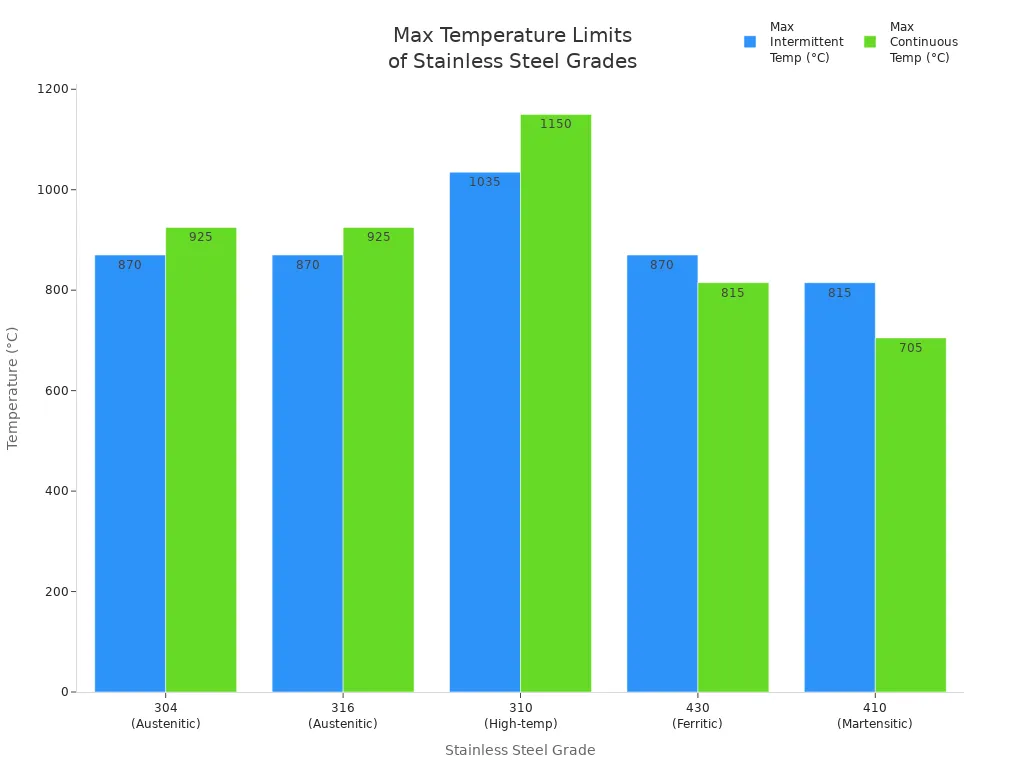
Temperature and pressure matter too. Some grades handle heat better. For example, 304 and 316 work up to about 870°C for short times and 925°C for longer use. Grade 310 can go up to 1035°C for even higher heat. Here is a chart showing the hottest temperatures for different grades:
As heat goes up, pipes hold less pressure. Always check both temperature and pressure ratings before you choose pipes. If you pick the wrong grade, pipes may bend, crack, or break.
Tip: Always match the grade of your stainless steel pipes to the chemicals, temperature, and pressure in your system. This helps you stop leaks and expensive repairs.
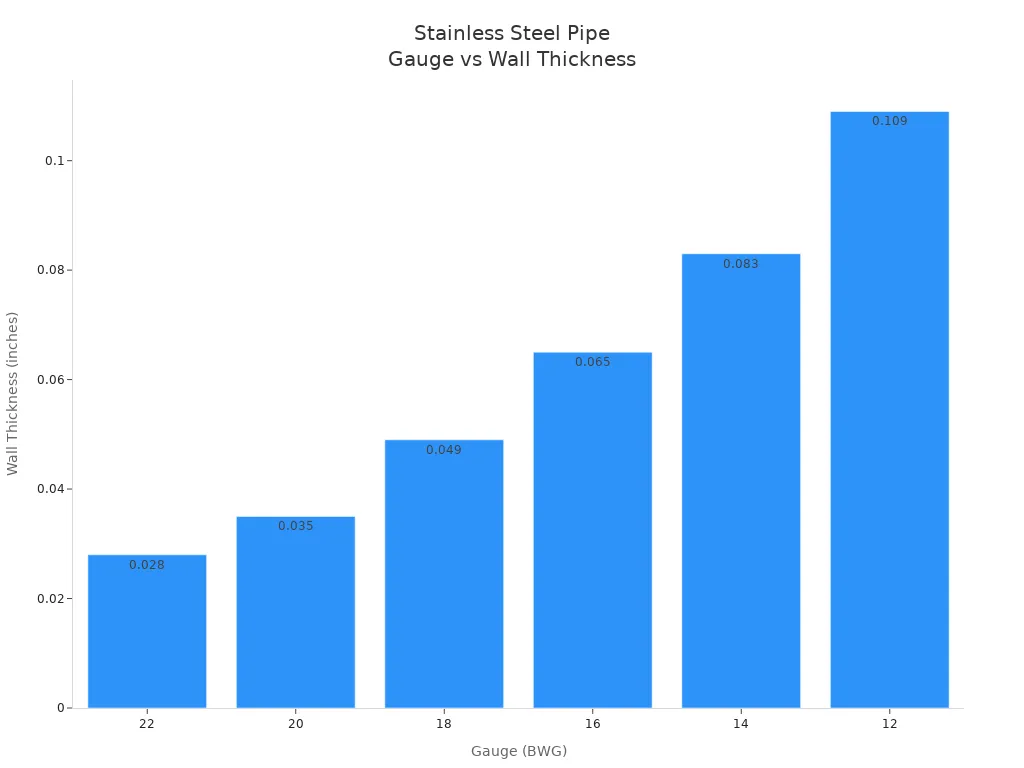
Measure your pipes carefully. Size and wall thickness make pipes strong and tough. Pipes come in different gauges. Gauges mean different wall thicknesses. Thicker pipes are stronger and resist pressure and corrosion better. Here is a table showing common gauges and their uses:
| Gauge (BWG) | Wall Thickness (inches) | Impact on Compatibility and Use |
|---|---|---|
| 22 | 0.028 | Thin, for light use, needs careful welding |
| 20 | 0.035 | Moderate, used in food-grade piping |
| 18 | 0.049 | Good for heat exchangers, strong and formable |
| 16 | 0.065 | Higher strength, used for frames |
| 14 | 0.083 | For exhaust and chemical processing |
| 12 | 0.109 | Thickest, for high-pressure and marine use |
Know about sizing systems too. Pipes use Nominal Pipe Size (NPS). NPS does not match the real outside diameter. Tubes use their true outside diameter. If you mix pipe and tube sizes, fittings will not match. Always check that pipes and fittings use the same sizing system. Dejia Steel gives pipes in standard NPS sizes. This helps you find fittings that fit right.
Alert: If you use the wrong size or wall thickness, your system may leak or break. Always check your measurements and match pipes to fittings.
When you pick pipes, think about how easy they are to install and clean. Seamless pipes are easier to clean and leak less. Welded pipes cost less and work for many jobs. Dejia Steel has both seamless and welded pipes. You can choose what fits your needs.
Picking the right material, grade, and size helps you build a strong system. It resists corrosion and is easy to take care of. This keeps your system safe and saves money over time.
Picking the right types of pipes helps keep your system safe. It also helps you avoid expensive repairs later. You need to match pipe details to what your project needs. This means looking at pressure, temperature, chemicals, and expert advice. Here are some main things to think about when choosing types of pipes for stainless steel systems.
Always check the pressure and temperature ratings before buying pipes. Each pipe can only handle so much pressure and heat or cold. These limits depend on wall thickness, grade, and design. For example, a 304 stainless steel pipe works from -196°C to 800°C. A 316 pipe can go up to 1000°C. Thicker pipes hold more pressure. If you use pipes outside their ratings, they might leak or burst.
Pressure ratings depend on:
Wall thickness and pipe size
Stainless steel grade (like 304 or 316)
Pipe design and how it is made
Temperature ratings depend on:
Alloying elements like chromium and nickel
Chemical makeup and grade
Industry rules (such as ANSI, ASME)
Tip: Always check both working and burst pressure ratings. Pick pipes that meet or beat your system’s highest pressure and temperature.
Think about what chemicals or things in the environment will touch your pipes. Some pipes resist acids, bases, and salts better than others. For example, 316 stainless steel resists saltwater and many chemicals. It is good for marine or factory sites. If pipes touch strong acids like hydrochloric acid, even stainless steel can corrode. High humidity, pollution, and big temperature changes also hurt pipes.
Common chemical and environmental risks:
Saltwater and chlorine ions cause pitting and crevice corrosion
Strong acids and bases can break down the protective layer
Fast-moving fluids may wear away the pipe surface
Pollution and temperature changes make corrosion happen faster
A smooth pipe surface helps stop corrosion by making it hard for stuff to stick. Always match the pipe grade to the chemicals and environment in your system.
For tough or important projects, talk to experts or trusted suppliers. They help you pick the best types of pipes for your job. Experts know the newest rules, grades, and coatings. They can help with pressure, temperature, and chemical resistance. Good suppliers give quality papers and help you avoid mistakes.
Steps to follow when consulting:
Check supplier reputation and customer reviews.
Ask for certifications and compliance papers.
Talk about your project’s pressure, temperature, and chemical needs.
Get advice on pipe grades, finishes, and if they fit together.
Plan your budget, including delivery and storage.
Note: Talking to professionals makes sure your pipes meet safety, work well, and fit your budget. This step is one of the most important things to think about when choosing types of pipes for any stainless steel system.
If you follow these steps, your types of pipes will match your project’s needs. This keeps your system safe, strong, and working for a long time.
When you repair a stainless steel pipe, you need to choose the right method for the problem. Some repairs need welding and sealing. Others work better with clamping or full replacement. Cleaning and testing always come last. Each step helps you keep your system safe and working well. Let’s look at the most common repair methods you can use.
Welding is one of the strongest ways to fix a stainless steel pipe. You use welding when you see cracks, holes, or broken joints. Before you start, always think about safety. Wear gloves, goggles, and a mask. Make sure the area has good airflow to avoid breathing in fumes.
Here are the main steps for welding and sealing:
Check Safety: Know the risks from fumes, gases, and electric shock. Use the right safety gear and keep the area well-ventilated.
Prepare the Pipe: Clean the area around the damage. Remove dirt, oil, and rust. Use a wire brush or a soft cloth. Make sure the pipe fits tightly at the joint.
Pick the Welding Method: Choose from stick welding (SMAW), TIG (GTAW), MIG (GMAW), or flux-cored (FCAW). TIG welding works best for thin stainless steel pipes. For thicker pipes, you can use a mix of methods.
Select the Filler Metal: Use low-carbon filler rods like ER308L. This keeps the pipe strong and stops corrosion.
Control the Heat: Keep the heat low to avoid warping the pipe. Move the torch slowly and use pulsing if possible.
Use Shielding Gas: Argon gas works well for TIG welding. It keeps the weld clean and stops rust.
Seal the Joint: After welding, use a sealant if needed. Anaerobic adhesives, such as 3M™ Scotch-Weld™ Stainless Steel High Temperature Pipe Sealant PS67, work well. These sealants cure without oxygen and make a strong, leakproof seal. They resist heat, pressure, and vibration.
Tip: Always use sealants made for stainless steel. PTFE tape and pipe dope work for threads, but anaerobic resins give the best seal for metal pipes. They fill gaps, stop leaks, and prevent galling or thread damage.
Welding and sealing give you a long-lasting repair. You keep the pipe strong and safe from leaks. This method works best for big cracks or when you need a permanent fix.
Sometimes, you do not need to weld. For small cracks or slow leaks, you can use a clamp. Clamping is fast, cheap, and does not need special tools. You wrap a stainless steel clamp with a rubber gasket around the damaged spot. Tighten the bolts to seal the leak.
Benefits of Clamping:
Quick and easy to install
No need to dig up or cut the pipe
Less damage to walls, floors, or landscaping
Works well for small leaks and minor cracks
Clamps last a long time if you use good materials. Top-grade stainless steel and high-quality rubber gaskets resist rust and pressure. If you install the clamp right, it can last as long as the rest of your plumbing.
Note: Clamping works best for minor damage. For big breaks or old pipes, you may need to replace the whole section.
Full pipe replacement costs more and takes longer. You need to dig up the pipe, remove the old one, and put in a new one. This method lets you check the new pipe for defects. It works well when the pipe has many cracks or is too old to fix. Trenchless methods, like pipe bursting or lining, help you avoid digging up large areas. These methods save time and money, especially under buildings or roads.
Here is a quick comparison:
| Method | Cost | Downtime | Durability | Best Use Case |
|---|---|---|---|---|
| Clamping | Low | Short | Long | Small leaks, minor cracks |
| Replacement | High | Long | Very Long | Major damage, old pipes |
| Trenchless | Medium | Short | Long | Hard-to-reach or buried pipes |
You can also use pipe lining or spiral winding for old or damaged pipes. These methods put a new layer inside the old pipe. They work well for sewage or long-distance pipes. Short pipe lining and pipe bursting help when you need to fix a section or replace the whole pipe without digging up the ground.
Alert: Always match the repair method to the damage and the types of pipes in your system. Clamps work for small problems. Replacement or lining works for bigger issues.
After you repair a stainless steel pipe, you must clean and test it. Cleaning removes dirt, oil, and rust. Testing checks for leaks and makes sure the repair worked.
Follow these steps for cleaning:
Use mild detergents or special stainless steel cleaners. Avoid harsh chemicals.
Clean with a soft cloth or nylon brush. Do not use steel wool or anything that scratches.
For oil or grease, use acetone or isopropyl alcohol. For rust, use a gentle acid cleaner.
Rinse the pipe with clean water. Make sure no cleaner stays on the pipe.
Dry the pipe with a microfiber cloth or let it air dry.
Next, restore the pipe’s protective layer. Soak the pipe in a passivating acid bath, like nitric or citric acid. This step brings back the chromium oxide layer that stops rust. Rinse the pipe again after passivation. Check the surface for spots or stains.
Tip: Never use cleaners with chloride. Chloride can damage the protective layer and cause rust.
Now, test the pipe:
Look for leaks by running water or air through the pipe.
Check the joints and repaired spots for drips or wetness.
Use chemical tests to make sure the passivation worked.
Inspect the pipe often to catch new problems early.
If you see any signs of corrosion or leaks, clean and repair the pipe again. Regular cleaning and testing keep your pipes safe and working for years.
By following these repair methods, you can fix most problems with stainless steel pipe. You save money, avoid big repairs, and keep your system running smoothly. Always choose the right method for the damage and the types of pipes in your system.
Start by isolating the damaged part of the stainless steel pipe. Turn off the water or fluid so nothing flows. This lowers pressure and keeps you safe. It also stops leaks while you work. If there is an emergency leak, use special fixtures. These can hold most of the pipe’s pressure.
Get the pipe ready for repair. Cut out the damaged part. Make sure your cuts are at least 50mm from the problem. Clean around the damage. Use a wire brush or a soft cloth. Remove oil, rust, and dirt. Check that the new stainless steel pipe matches your system. The material and size must be the same. This helps you avoid connection problems and safety risks.
Tip: Always wear gloves, goggles, and a mask. Good airflow helps protect you from dust and fumes.
Pick the best way to fix your stainless steel pipe. For cracks or holes, welding is best. Use welding materials that match your pipe’s grade. TIG welding works well for thin pipes. It makes strong, clean joints. Keep the heat low so the pipe does not bend. For 316L stainless steel, use sulfuric acid pickling after welding. This brings back corrosion resistance.
If you see corrosion, weld and polish the spot. Replace the pipe if pitting is deep. If it goes past 20% of the wall, change the pipe. For leaks at joints, swap out flange gaskets or use PTFE-wrapped gaskets. Clamps fix small leaks. For stress corrosion, replace the whole pipe instead of just welding.
Keep cathodic protection systems working. Use sacrificial anodes and calibrated rectifiers. Fix coating damage by sandblasting to Sa2.5 grade. Put on an epoxy primer with at least 150μm dry film thickness.
Alert: Pick the right connection method for your job. Use compression, welding, threaded, or flange connections as needed.
After you finish, test your stainless steel pipe for leaks. Start by looking at the pipe. Check for cracks, dents, or loose joints. Next, do a pressure test. Fill the pipe with water or air. Slowly raise the pressure. Watch for drops in pressure. Put soap solution on the outside. Bubbles show where leaks are.
You can use advanced tests too. Try ultrasonic testing or dye penetrant testing. Dye penetrant testing finds small cracks on the surface. Ultrasonic testing finds hidden problems inside the pipe. Here is a table with common leak testing methods:
| Testing Method | Description | Best Use Case |
|---|---|---|
| Visual Inspection | Look for visible damage or corrosion | Quick check before advanced testing |
| Pressure Testing | Monitor pressure drop and use soap solution | Most common for pressurized pipes |
| Dye Penetrant | Apply dye to find surface cracks | Detects small surface defects |
| Ultrasonic Testing | Use sound waves to find hidden flaws | Non-destructive, internal defects |
Note: Keep insulation layers free of chloride ions. Test to make sure the level stays below 50 ppm.
Check your pipes often and test for leaks. This helps you find problems early. Your stainless steel pipe system will stay safe and last for years.
Picking the right Stainless Steel Pipe and repair way helps your system stay safe and last a long time. You should:
Choose materials like AISI 304 or 316 because they fight rust and are easy to fix.
Measure pipes well and clean them before fixing so you do not get leaks or more damage.
Use the right welding and coatings to make repairs strong and keep them working.
Ask experts for help on hard projects so you get good advice and support.
Remember, planning ahead and getting expert help makes your Stainless Steel Pipe repairs last longer and work better.
You should use welding for large leaks or cracks. For small leaks, a stainless steel clamp works well. Always clean the area first. Test the pipe after repair to make sure it does not leak.
Check your Stainless Steel Pipe system at least once a year. Look for rust, leaks, or dents. Early inspection helps you find problems before they get worse.
No, you should avoid cleaners with chloride. Use mild soap or special stainless steel cleaners. Chloride can damage the protective layer and cause rust.
Replace your Stainless Steel Pipe if you see deep pitting, many cracks, or if the pipe is over 70 years old. New pipes last longer and keep your system safe.


